Welcome!

This blog is no longer active, come over to www.quiltingbuttercup.com for more.

Wednesday, July 10, 2013

How to make an Utensilo


Eventhough my sewing desk does have many big drawers, I've accumulated so many tools and materials over time, that every inch of space is stuffed. So I finally decided to make myself a utensilo that, hanging on the wall, can keep some of the things I don't need that often, or that I don't really have a place to put (like my big ruler, it's always in the way).
These utensilos are functional and a nice accessory for decoration and can be adapted for the childrends' room, bathroom or kitchen or wherever you need to stow away stuff.


My finished utensilo measures appr. 60x70cm.
I started by cutting three rectangles of that size from my fabric, batting and backing. Additionally I cut strips for the pockets of all three layers, the lower pocket strip measures 20x70cm, the upper, shorter strip, 20x40cm.

To get started, place the three layers for each piece on top of each other, with the backing coming first, right side down, the batting and last the fabric right side up.


Quilt the layers together. For evenly spaced parallel lines I use the guide that comes with my sewing machine.


In this case I opted for a simple grid, quilting parallel lines first horizontally and then vertically to cover the whole piece.


Prepare all three pieces in that way and square them off.


Now you need to prepare the strip for binding. I will need to bind the upper edge of the lower pockets (70cm), the two long and left short side of the upper pocket (1m) and then the whole quilt (2.6m). Therefore I will need at least 3.5m (the corners take up a tiny bit more and your need longer edges in order to be able to close the binding that goes all the way around the utensilo.

Cut enough strips of 10 cm to join them to a strip of the needed length. To join the strips, place the ends of two strips perpendicular to each other right side to rigth side and sew right through them as shown below.


Cut away excess seam allowance and keep on adding all pieces to one long strip.


To prepare the strip for binding, first iron it in half lengthwise, then iron the two raw edges for 0.6cm of seam allowance to one side of the strip.

In order to attach the binding to the upper edge of the big pocket and the three edges of the upper pocket, pin it in place on front and back and attach with a simple straight stitch close to the edge. Don't worry about the other edges, they will be included in the binding of the whole utensilo. For more detailed information on how to bind a quilt have a look at this tutorial.


Apart from the pockets I need to prepare a strip of fabric that will hold the upper part of my long ruler in place.
Cut a strip measuring 3,2 x 35cm and fold it in half lengthwise, right side inside.


Sew a straight seam along the long side to create a sleeve.


Turn the sleeve inside out and insert a piece of elastic that's 30.5 cm long.

Now place the background piece on the table and align the lower pockets with the lower edge and corners of the background. Then place the upper pockets with the raw side aligned to the right side of the utensilo at the desired height and place the elastic strip on the left so that one end will get caught in the binding while the other end will be attached under the upper pocket.


Pin the binding in place starting in the middle of one short side possibly on the top as there's only one layer to deal with. When pinned, attach the binding leaving about ten cm of the strip at the beginning and the end unattached and fix your seam at the start and at the end with a couple of backstitches.


To pin binding in place I find that Clover Wonder clips work really great, they hold the binding in place without any distortion. But you can do the same with regular pins, it's just a little bit more difficult.
Finish the binding as explained in my binding tutorial.


Now attach the lower and right sides of the upper pockets making sure to fix the right end of the elastic strip in the process. Make sure all your layers lie flat and sew a simple straight stitch through or right next to the binding to attach the pocket.


Think about how many single pockets you want and how big they should be. I will need the left part of the lower pockets to be just big enough to hold my long ruler. Then I want another 3 pockets on the lower strip while I will divide the upper strip into only 2 pockets.

To divide pockets, sew a straight seam fixing the pocket layer and background together where you want the division to be.


Finish dividing your pockets and attach strips or a sleeve or whateve is good for you to hang the utensilo up. In my case it goes on a more than 3m high wall where it's hung on a painted pipe (see below) so that I simply attached two long strips that I knotted around the pipe. I had to add a stick on the top of the backside of the utensilo to keep it hanging straight, too.


Have you made a project following this tutorial? Let me know what you think. Did you like it? Was it easy to understand and to follow? Do you have any suggestions?
Write a comment or send me an mail using the contact form at the bottom of the page.


-->

Friday, July 5, 2013

How to make a neckholder glassbag

How annoying is it to never know which one was your glass during parties or outdoor events? Plus I don't really like to drink from paper or plastic cups (apart from all the trash that piles up), drinks simply taste better from real cups, especially if it's wine or cocktails. Only that then you end up either carrying that glass around all the time or leaving it to be mixed up with the others.

Here's the solution: a little carry-around-your-neck glas holder


They're quick to make (it took me a mere 20 minutes with taking pictures and everything), they're cute and they're a great gift for your guests when for example hosting a standing garden party.

What you need:
a little bit more than 1/2 a fat quarter.
If you want to make more get several fat quarters and mix and match the fabric for the bag and binding.

I designed mine to fit these three glas types in order to be flexible:


A good height for all three glasses is 13cm, that's slightly under the rim of the straight glas and a little bit lower for the other two. The circumference of the biggest glass (upper part of Coke glas) is 25cm.

Therefore I cut one strip measuring 36 x 16.5 cm. That's because the strip will be folded over to create a bag (38/2=18cm) The hem on both ends will use 2cm per side leaving a length of 16 cm. With the round bottom of the glass having a diameter of 6cm, the bottom uses another 3cm per side leaving the finished side length at 13cm.

Start by folding the raw edge of the short side of the rectangle over twice creating a hem measuring roughly 1 cm and hiding the raw edge inside the folds. Sew in place.


Prepare the hem this way on both short sides.
Then prepare the strip for the binding and neckholder. Cut 4cm wide strips that total about 110cm.
If you have several shorter strips join them as shown below.


Place the ends of two strips right side to ride side with one strip perpendicular to the other and sew diagonally through the tip. Cut away excess seam allowance. This is the same process as preparing binding, for more detailled information have a look at this tutorial).


Prepare the strip by ironing the seam allowance on both long sides towards the inside of the strip.


Then iron the strip in half lengthwise.

To finish the bag, fold the seamallowance at the end of the binding strip towards the wrong side, wrap the binding around the bottom edge of one side of the bag and pin in place. Pin the binding along that side of the bag, enclosing both sides of the bag inside the binding up to the top. Do the same at the other open side of the bag wrapping it into the other end of the binding making sure that the long strip is not tangled or twisted where it forms the handle.


The picture above shows the bag with the binding pinned in place forming a long neckholder on the top.
Sew the binding in place starting in one corner and sewing all the way around the strip, joining it to the bag and closing it on the neckholder part.


        Now fill your glass, place it
        in your neckholder
        glassbag and enjoy the
        party!


Have you made a project following this tutorial? Let me know what you think. Did you like it? Was it easy to understand and to follow? Do you have any suggestions?
Write a comment or send me an mail using the contact form at the bottom of the page.


-->

How to make an easy no zipper pillowcase

Inserting a zipper is often the most difficult part in sewing projects. Here's how to make an easy no zipper pillow case that's quick to make and lookes great.


What you:
Cotton fabric
Contrasting fabric for the opening on the backside (see above)

First measure your pillow. Mine measures 75x47 cm.


You will need a strip that is twice as long as the length of your pillow plus about 10cm that overlap and 3cm for the hems.

Therefore my finished strip whould be 164cm long (75x2 + 10 + 4). I therefore cut a 141.2cm strip of my fabric and two 12.6cm strips of my contrasting fabric for the opening on the back. Joining the two contrasting strips to the big strip with a seam allowance of 0.6cm the finished strip will be 164cm.
The height of the strips is 50cm.

Start by creating a hem on the contrasting fabric where the two strips surrounding the opening overlap. Fold one long raw edge over twice towards the wrong side of the fabric for about 1cm, hiding the raw edge inside the fabric folds and so into place with a straight stitch close to the edge of the hem.


Now attach the strips to the short sides of the main fabric. Place the fabrics right side to right side, with the raw edged long side of the contrasting fabric on the short side of the bigger piece. Attach both strips.
If you have a serger, use that as it covers the seam allowance protecting it during usage. If you are working with a normal sewing machine, zigzag the seam allowance for protection in addition to your straight seam.


When done place the long strip on your working surface and fold it as shown above wrong side out. The front of the fabric is made up entirely of the main fabric while on the back you have the two overlapping contrasting strips. Make sure the length of one side correponds to that of your pillow, if not adjust increasing or decreasing the space where the two sides overlap.
On the back of the pillow case the short side should be about 20cm in order to  firmly hold the insert in place without inserting it becoming too difficult. The longer side should be placed underneath the overlapping shorter side.

When your are satisfied pin the layers together and sew along the two long sides using your serger or adding a zigzag seam along the raw edges of the seam allowance with your sewing maching.

The pillow cushion will look like this:


Now turn the pillow case inside out through the opening and insert your pillow by sliding it first all the way into the case through the opening


and then pulling the shorter side over the top of the cushion.


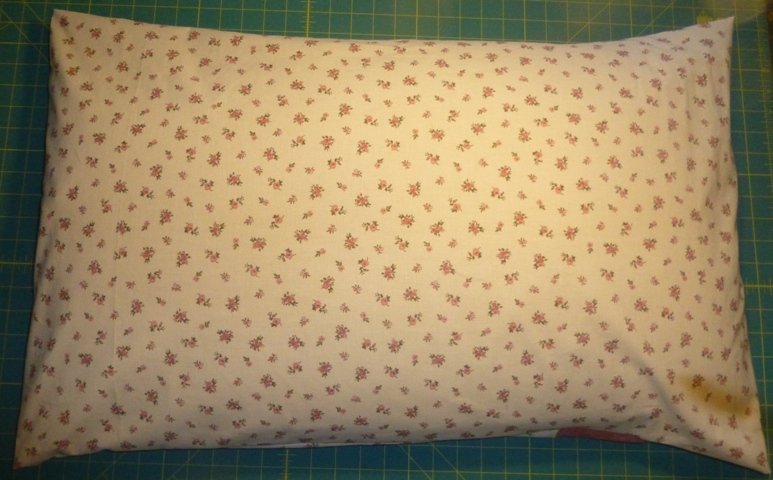
And here's your finished pillow:


Have you made a project following this tutorial? Let me know what you think. Did you like it? Was it easy to understand and to follow? Do you have any suggestions?
Write a comment or send me an email using the contact form at the bottom of the page.


-->

Monday, July 1, 2013

How to make a flounced cushion with piping

In this tutorial I will show you how to make a flounced cushion with piping.


I love these cushions in romantic Laura-Ashley-style designs, as you can easily see from the picture above, and they aren't that hard to make yourself.

This is what you need:

- fabric for the cushion
- fabric for the flounces (may be the same as for the cushion or another matching or
  contrasting fabric. Consider that there is the piping, too, so you could use that to add contrast
  to the cushion using the same fabric for the cushion's body and the flouncing. If you prefer to
  use different colours, make sure they work well together).
- fabric for piping (see above)
- cord for piping (I prefer to use Wrap 'n Fuse Piping by Nancy Zieman from Clover, it is wrapped in fusible interfacing and can be ironed on easily)
- zipper


How much fabric do you need?

General considerations:
Cushion: two squares (back and front) in the desired size of the cushion plus seam allowance. My finished cushione should measure 50x50cm, so my fabric squares measure 51,2x51,2 cm.
Flounces: you need a strip that is a bit longer that the perimeter of the cushion. In my case the perimeter is 2m (4x50cm) and therefore my strip will be over 3m (I pieced three strips of 110cm fabric, so the actual length is 3.3m). Consider that the longer your strip is, the more flounces you will get. Regarding the construction of the flounces you can make them single or doublesided (see picture below, the blue is single sided, on the back of the flounces you see the wrong side of rhe fabric, while  the pink double sided). For the double sided flounces you will need strips that are twice as high as you will fold them in half.


Piping:     length: single perimeter of the cushion plus a couple of inches for corners; width:
                 3,5cm (the piping fabric will be wrapped around the cord and inserted into the seam
                 so what will be seen is only the cord wrapped in fabric).
Cord for piping: same length as piping
Zipper:     depends on the size of your cushion, it should be slightly shorter than the side it is
                  supposed to go into.

Fabric measurements for a 50x50cm cushion with double 10cm flounces:

Cushion and flounces: 120cm of 110cm (44in) wide fabric
Piping: 1 fat quarter

 Construction:

1) Cut the two squares from your cushion fabric (51,2x51,2cm)


2) Cut strips from flounces fabric. You will need a finished strip of at least 3 m, cut enough strips to achieve that length and join the pieces as shown below. For double sided flounces your strips will need to be 21,2cm high while for single sided flounces 11,2cm are sufficient.


3) Cut strips for the piping. Cut a bias strip following this tutorial, then wrap the fabric around your piping cord. With fusable piping simply fold the strip in half lengthwise, place the cord inside the fold and iron over the fabric fusin everything together.


4) Attach the piping to one of your fabric squares (this will be the front). Place the piping around the outer edge of the right side of the fabric with the raw edges facing outward and the piping facing inward and sew in place using your zipper foot as shown below. Start sewing from one of the corners.


Go slowly when you get to the corners, sew until you are close to the edge, then stop with the needle down and turn the fabric.


  Finish attaching the piping in the corner where you started as shown below.


This is what the cushion would look like, if you attached the back now without adding the flounces:


5) Prepare the flounces. Sew your strips into a circle, joining the two short edges in the way you joined the single strips.Then fold it in half lengthwise right side out for the double sided flounces. For single sided flounces fold the fabric on one long side over twice to create a hem and sew in place. You can make the flounces with your ruffler foot if you own one. If not set your straight stitch to a long stitch length, at least 5, but even longer, if your machine does that. Sew two parallel lines close the long raw edge of your strip and leave longer threads at the beginning as well as at the end of each seam.

Now grab only the two bobbin threads and tug in order to create the flounces.


Continue to do this until your strip is of the correct lenth, in our case approximately 2m. When you achieve the correct length, distribute the flounces evenly over the whole length of the strip. Then place the flounces right side to right side around the whole perimeter of the front of the cushion and the piping with the raw edge facing outwards. Adjust the remaining difference in length, if you have one and pin in place.


The piping lies in between the cushion and the flounces.


Attach the flounces to the cushion with a straigth stitch (remember to shorten your stitch length after sewing the two parallel lines for ruffling) using your zipper foot (use the zipper foot, because underneath the flounces there's the piping and you want to sew as close as possible to that).


6) Attach the back of the cushion. Place the back of the cushion right side to right side onto the front with the piping and flounces inside. 


Pin the two layers together. Before sewing decide where to put the zipper and mark the beginning and end points onto your cushion with an erasable pen.


Sew the layers together from zipper mark to zipper mark with a straight stitch, fixing the seam with a couple of backstitches at the beginning and at the end.


7) Attach the zipper. Place the zipper in the opening and pin it in place right side to right side on one side first with the ends of the zipper on the wrong side of the fabric as shown below.


Sew in place with your zipper foot. Then attach the second side in the same way.
Last, attach the ends of the zipper to the inside of the cushion with a couple stitches.

Now turn the cushion inside out through the opening and you're done.


For a tutorial on how to make a cushion insert, have a look here.

Have you made a project following this tutorial? Let me know what you think. Did you like it? Was it easy to understand and to follow? Do you have any suggestions?
Write a comment or send me an email using the contact form at the bottom of the page.


-->

Sunday, June 30, 2013

How to prepare a bias strip

In sewing you often need bias strips, they perfectly adapt to cureves and angles. You can get ready made bias strips in a good variety, but I prefer to have exactly the strip I want, in a certain matching fabric or just that hue of blue or red or whatever colour I am working with. Luckily, making your own bias strips is pretty easy.

"Bias" refers to the diagonal of the fabric, where it is more elastic.
In order to prepare your own bias strip, all you need to do is fold your fabric over along the diagonal and start cutting from there.

I am working on a fat quarter, so length and width are slightly different.
Start by folding the quarter diagonally into a triangle as shown below.


 Then I simply cut along the folded edge.


Cut enought strips to join them to the length you need considering that joining two strips you will lose a good inch.

Join the strips together as shown below, placing them right side on right side and sewing diagonally (like that the seam will run diagonally when the bias is folded and create less bulk).


 Continue joining all strips in the same way.
When done cut away excess seam allowance.


Iron the seams open.


And here's your finished bias strip.


Now all you need to do is iron it in form for it's intended use (for example ironing the seam allowance on both raw edges for binding etc.) and you have perfectly matching bias.

Have you made a project following this tutorial? Let me know what you think. Did you like it? Was it easy to understand and to follow? Do you have any suggestions?
Write a comment or send me an email using the contact form at the bottom of the page.