Welcome!

This blog is no longer active, come over to www.quiltingbuttercup.com for more.

Wednesday, July 24, 2013

Beach inspired bathroom caddy

This bathroom caddy is made with a thicker and rather rigid batting. Given that my bathroom has beige tiles I chose this beach inspired beige linen fabric.


First I cut the basic shape from my front fabric, rigid batting and backing. Then I cut the pockets, two strips for the upper and two strips for the lower pockets, that are just as wide as the batting and as high as I wanted the pockets to be. Additionally you will need strips for binding.


I joined the front and lining of the pockets placing the pieces right side to right side and sewing only the top seam.


 For the upper pockets I ironed a double hem towards the inside of the pocket


 Then I laid all layers out as follows:

Backing fabric, wrong side up
Batting
Front fabric, right side up

and I placed the pocket strips on the background, clipping everything in place.


All open edges of the lower pockets will go into the binding, while the lower edge of the upper pocket will have to be attached before. I placed the strip with the hem towards the inside in position and attached it with a simple straight stitch.


Then I made the seams dividing the upper and lower strips into pockets.


For the binding prepare a long enough strip and pin/clip it in place all around the caddy. For more information on how to bind a quilt have a look at this tutorial.
Cut another two short strips of 5x2 inches. Iron the seamallowance on both long sides toward the inside, fold in half right side outside and sew together.


Fold the two strips in half and place them underneath the binding close to the top corners of the caddy as shown below.


Attach the binding and, at the same time, the loops. Given that I used the heavy batting and fabric, I used a heavy duty jeans needle.

With the rather rigid batting, I wasn't able to finish the binding as shown in my binding tutorial. Therefore I did this:

I cut the two ends so that they overlap for perhaps 2 inches.


I placed one end along the edge of the caddy while I turn over the edge as shown below on the second end.

Then I folded the second end (with the folded corner) around the edge of the caddy achieving the effect shown below.


I turned the binding over to wrap around the outer edge of the caddy and the other end of the binding.


Last, I finished the binding by sewing it in place.


And here's the finished cadd:


Have you made a project following this tutorial? Let me know what you think. Did you like it? Was it easy to understand and to follow? Do you have any suggestions?
Write a comment or send me an mail using the contact form at the bottom of the page.


Toilet lid upcycle

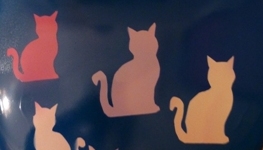
Bringing some colour into your bathroom and personalizing objects is so fun and easy. This time I decided to upcycle the toilet lid.


I prepared a paper template for the cat in two sizes and traced it onto adhesive plastic foil.


I cut the single adhesives from the foil.
Then I prepared the toilet lid by covering the actual seat in adhesive tape in order to protect it from being coloured.
After that I sprayed different colours (ivory, lavender and violet) in patches onto the toilet lid and let dry.


When the finishing had dried I placed the adhesives onto the single colours making sure they adhered perfectly on all sides.


Then I sprayed dark blue finishing all over the toiled lid, covering the whole piece.
I left the lid to dry over night and in the morning I went to peel the adhesives off, uncovering the coloured cats.


Have you made a project following this tutorial? Let me know what you think. Did you like it? Was it easy to understand and to follow? Do you have any suggestions?
Write a comment or send me an mail using the contact form at the bottom of the page.


Sunday, July 21, 2013

How to make a fabric covered basket


Today I finally decided to upcycle this little blue basket I have left over from some Easter nest by covering it with quilted fabric.


To cover your basket follow these simple steps:

Trace the bottom of your basket on paper and cut out the template.


Measure the circumference of the template and of the upper ridge of the basket.

Cut the bottom template and strips (lower edge length circumference of bottom, upper edge length circumference of the upper ridge - center the bottom with regards the upper edge) of your top fabric, batting and backing each. Cut a 3.5inch / 5cm wide strip of your binding fabric just as long as the upper edge of the basket.


Now place the backing on the table right side down, the batting centered on top of it and the top fabric right side up on top of the other two layers. Quilt the layers together. I quilted a simple grid.


Quilt both the bottom and the sides of the basket cover and cut the pieces to size.


Now preprae the double binding for the (longer) upper edge of the sides of the cover. For a tutorial on how to bind a quilt click here.

Attach the binding to the upper edge of the strip and sew in place.


Join the two short edges of the strip together to close the circle and then pin the bottom to the lower edge of  cover.


Sew the bottom and sides together to finish the cover.


Place the cover inside the basket and turn the upper edge over the ridge.


 You can hot glue the cover to the basket, but if the measurements are right, the cover will stay in place by itself and it will be possible to take it out for washing if necessary.


Have you made a project following this tutorial? Let me know what you think. Did you like it? Was it easy to understand and to follow? Do you have any suggestions?
Write a comment or send me an mail using the contact form at the bottom of the page.


Saturday, July 13, 2013

Sewing case makeover

I received this sewing case for christmas. Unfortunately it wasn't very nice to look at and so I put it aside for the time being while figuring out what to do with it.
I finally settled on giving it a spray varnish finishing, but I wanted something cute, not just a simple colour and so I went for red hearts on an ivory background.


This is what I did:

I started out with this very plain sewing case.


It had the remains of a nondescript finishing.


I cleaned the case and treated it with glasspaper before spraying it red.


Then I cut heart shapes of different sizes from adhesive plastic foil and stuck them so they covered red areas.


Then I sprayed the whole case with ivory varnish and left it to dry.


When the first layer of varnish was dry I opened the case and sprayed parts of the inside as well as the open sides of the cases where the joints moved out of position.


The next morning, with the finishing perfectly dry, I removed the adhesives and so now on the outside the case has red hearts on an ivory background


while on the inside it's simple ivory, and on the lower levels, wood.


What a difference...


Have you made a project following this tutorial? Let me know what you think. Did you like it? Was it easy to understand and to follow? Do you have any suggestions?
Write a comment or send me an mail using the contact form at the bottom of the page.


-->