Welcome!

This blog is no longer active, come over to www.quiltingbuttercup.com for more.

Friday, May 24, 2013

How to make a quilt-as-you-go striped placemat, table runner or baby quilt

Quilting-as-you-go you can create beautiful quilts in a short time. I especially love this technique for the creation of little things, like placemats, table runners or baby quilts.
The technique is pretty simple and so are the designs you can achieve, but that only offers a lot of possibilities to finally use all those fancy fabrics, that lose their glamour in a more elaborate quilt. So play with fabrics and colours, match amd mix prints and keep in mind that all combinations are allowed as long as you like it.


Materials:
Strips of the desired length and width of coordinated fabrics for the top
1 piece of batting in the desired size
1 piece of backing in the desired size
Coordinated fabric for binding

Tools:
Rotary Cutter, selfhealing cutting mat, quilting ruler - or fabric scissors
pins
sewing machine
iron & ironing board


In this tutorial we will be making a 35x55 cm / 13½x21½x in placemat. In order to make bigger quilts, a table runner, baby blanket or lap quilt, adjust the sizes accordingly.

Getting started: 

Put your backing right side down onto a flat surface and put the batting on top of it making sure that they are perfectly aligned, pin together.

Choose from which side of the quilt to start. Cut the fabrics for the top into strips using your rotary cutter and ruler on your self-healing cutting mat, or, if you don't have any of those, your fabric scissors. The strips may be of the same or of different width, according to the effect you want to achieve. All strips in the upper mat have the same size while the strips in the mat underneath have different width.


The strips should be a little longer than the largest part of your quilt, as shown in the drawing below:  


 Starting on the short side you will need strips that are a little longer than the width of the finished placemat (37 cm/ 14 in), starting from the long side you will instead need the strips to be long enough to cover the whole length of the quilt (55cm/ 23 in). For the diagonal setting you will need different length strips according to the position on the quilt, to determine the exact length you need, calculate it from the measurments of your quilt or simply cut your backing and batting to size and then measure the diagonal).

Now your are ready to start sewing.
Take your backing and batting and place the first strip of top fabric right side up onto the side from where you chose to start, aligning it with the edges of the sandwich. Then put the second strip wrong side up onto the first strip, again aligning the edges (when you do the diagonal version, make sure the second strip is a little longer than the first one in order to cover the larger edges of the adjoining space). Pin into place.
As you can see in the picture below, I chose to start from one of the short sides.

Sew along the edge of first and second strip, sewing through all layers (two top strips, batting and backing). I use a ¼-inch presser foot and the edge of the fabric as a guide.


Flipping over the whole sandwich you can see how, on the backing, the seam joining the two strips on the front at the same time acts as quilting, keeping all layers together.
Flip over the second strip and iron in place.


Now add the third strip by placing it wrong side up onto the second strip, aligning the edges and then sewing through all layers.


Flip over and iron.
Add the remaining strips following the steps explained above.
When the whole area is covered with strips your sandwich will look something like this:


As you can see the body of the quilt is practically done and already quilted.
Now square the sandwich up, cutting it to size.

Bind your quilt with matching fabric (for more detailed information on binding, go to my binding tutorial) and you're done.


With the right fabrics you can adapt this quilt to lots of occasions: Use pastels, pinks or blues to make the perfect gift for a baby shower, use bright fabrics for summer or greens and reds for christmas.


Have you made a project following this tutorial? Let me know what you think. Did you like it? Was it easy to understand and to follow? Do you have any suggestions?
Write a comment or send me an email using the contact form at the bottom of the page.

-->


Thursday, May 23, 2013

How to machine-bind a quilt

Binding is a difficult subject.
I simply don't have the patience to bind traditionally, attaching the back by hand. It's just too time-consuming. I have read and watched lots of tutorials on binding and tried several tecniques. Here's what works best for me (and with "works best" I mean the best compromise between good looks and praticality):

One-pass machine binding

As the name says, you only sew once directly through all layers. To be able to do this, however, you need to prepare your sandwich and binding carefully before sewing.

First measure the circumference of your quilt. You will need a strip a little bit longer than the sum of the four sides (for angles and joining the two ends). I am binding a 35x55 cm /13½x21½ in placemat, therefore I need 180 cm/ 70½  in plus about 20cm/8 in of spare length. My binding will show for about 1,2 cm/ ½ inch on the front and it will be single layer (if you want a double layer binding increase the width of the strips to almost double).
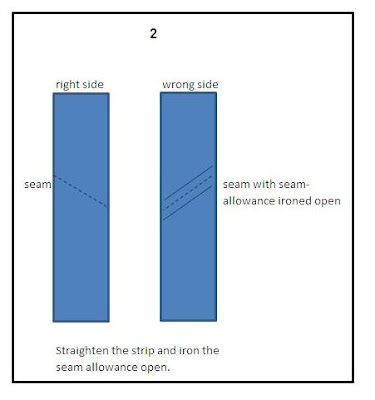
Cut strips of 5 cm/2 in and join them as shown below into one long strip. Trim away excess seam allowance, then straighten the strip and iron the remaining ¼ of an inch seam allowance open.

Iron the strip folding over both edges for a good ¼ of an inch towards the wrong side of the fabric. (For double layer binding fold the strip in half lengthwise right side out and then fold the two rough edges to one side). 


Attach the binding to the quilt as shown above pinning it carefully in place, wrapping the binding around the edge of the quilt as shown below. Start from somewhere on the lower half of one of the sides and leave at least the first cm /6 in loose, they will be sewn into place after having closed the binding on itself.


Leave the binding on the back a little larger than on the front. You will be sewing from the front and won't be able to see the back and therefore you must be sure to catch the back part of the binding as well. Pin carefully and don't leave bigger spaces without pins, as when sewing you need both sides to be perfectly positioned in order to catch both edges and not risking to have any holes where the binding is not attached to the quilt on either side.
In order to be sure to catch both sides I insert the pin from the front close to the edge of the binding going through all layers, binding on the backside included and then back to the front. While on the front of the quilt the pin is very close to the edge of the binding on the back there should be a little more space between the pin and the edge of the binding.


Sew the binding in place starting from where you pinned the beginning of the strip onto the quilt using a matching thread in order to hide the stitches as much as possible (as explained above that should be in the lower half of one of the sides and the first 15 cm/6 in of the binding must not be attached yet). 


Fix the seam by doing a couple of backstitches and then sew all the way around the quilt close the edge of the binding on the front of the quilt taking the single pins out as you reach them. 


When you reach a corner fold the edges in order to have mitered corners as shown below.


 Pin the binding in place until you reach the corner.Place the binding just until the edge of the quilt and hold it down with a pin.
 With your finger fold the binding over making the mitered corner. 

Stop sewing fixing the seam with a few backstitches at least 15cm/6 in before the point where you started attaching the binding. You now have most of the binding attached with beginning and end dangling freely. Now we need to join the two loose edges in the way we have been joining the single shorter strips before, only that now we have to measure exactly where to sew in order to have binding that is just as long as the side of the quit as otherwise there will be ugly creases.
Lay the binding around the last open space making the two loose ends meet in the middle. Where the two strands meet put them together right side to right side as shown below.


Trace the line where the two strands will be sewn together in order to fit the quilt perfectly.

Go back to the sewing machine and, folding the quilt so that the two strands are loose, put them right side on right side as shown above (see where we talk about joining the small strings to get one long strip). Make sure that there are no twists or turns (the easiest way is to put a pin at more points through the line where the seam will go and see if the string opens up nicely when sewn). 


 When everything is ok sew as explained above. Trim away excess seam allowance and iron open.

If you spread out the quilt the remaining binding that has not been attached yet should be just as long as the open space. Pin in in place in order to catch both the upper and lower edge of the binding when sewing and sew in place securing the seam with a few backstitches in the beginning and in the end.

And here's your finished quilt!


Have you made a project following this tutorial? Let me know what you think. Did you like it? Was it easy to understand and to follow? Do you have any suggestions?
Write a comment or send me an mail using the contact form at the bottom of the page.


-->

Tuesday, May 21, 2013

The Cat Block Design


I have designed my own blocks before and combined them into my own quilts, but today I designed a block so I could sell it online.
I have actually sewn it and I have prepared a pdf-file with instructions and the foundation pattern. There's the foundation I used for the block below with pieced eyes and there is the option to add the eyes later using applique or embroidery - you decide.
I have sewn Coccolina and I will create more blocks, because obviously I need to make Buttercup and Puffo, too. That's the nice thing about the block, adjusting the colours of the fabrics you can make any cat you want.


The block is on sale on craftsy and I'm sooo curious to see what will happen... should you make the block, please publish a picture on craftsy so I can have a look!


I am excited!!

-->

Sunday, May 19, 2013

How to make crazy pieced blocks

Crazy pieced blocks are generally foundation pieced. The technique I will explain step by step below is done starting from the center adding pieces circling around the center piece.


Start by cutting the foundation to the size you want your block to be. My block measures 12 x 12 inches. Choose the fabrics to use for your crazy block. This project is a good way to use your leftovers and scraps.


 I am using a sturdy cotton as foundation and a range of bluish scraps I have left over from other projects. My foundation is cut from a printed fabric which is not a problem as my other fabrics are darker and the print can not be seen through. If you should use light fabrics make sure you have a light background.

You start by putting down the center piece onto the foundation with the right side of the piece facing up. I chose this light blue fabric with the fly print and I want the green fly to be the center of the block.


 The following pieces will be added in a circular fashion around the center piece. You can start your circle anywhere, I will start on top of the center piece.


Add the second piece putting it right side down onto the center piece. Arrange it over the center piece in the desired fashion, but keep in mind that the seam will run at the distance of the seam allowance form the border of the piece which will then be ironed open.


Put the foundation with the two pieces of fabric on your sewing machine to sew the pieces in place. You will need to sew through 3 layers: the foundation, the first piece (right side facing upwards) and the second piece (right side facing downwards). I use a quilting 1/4 inch foot and thus all I have to do is align the outside of my foot with the edge of the fabric in order to achieve a perfect 1/4 inch seam allowance.

After sewing flip the fabric over to see whether you achieved the desired effect, if not open the seam and reposition the fabrics. If you are satisfied flip the block turning the foundation back onto itself along the seam you have just sewn exposing the seam allowance of the two fabrics and trim away excess fabric.


Turn the block over, flip the second piece of fabric open and iron in place.


Add the third piece of fabric following the same steps you used to add the second one. Choose your fabric and add it in a circle around the center piece. Remember to put it right side down with it's outer edge marking the edge of the seam.


Sew through the 3 layers of foundation, fabrics already sewn down and the newly added piece.

 Check the position, trim away excess fabric of the seam allowance and iron the piece into place.
Then add the next piece keeping on creating a circle of pieces around the center: position the piece, sew in place, trim away excess fabric, flip open and iron in place.


After you close the first circle around the center, keep on moving in the same direction, increasing the diameter and covering more and more of the foundation. Keep in mind that you always need to cover the already sewn down pieces in order not to have any open edges showing.


 Depending on the pieces' size you will cover one part of the block faster than others. When you reach the edge of the block like I did on top of the block below, just skip that side and keep on circling covering the remaining areas of the foundation.


 In this case I found the dark blue piece on top too big and imposing and therefore decided to cover part of it with another piece of lighter blue colouring.


 Continue until the whole foundation is covered and your block looks somewhat like this:


 The pieces protrude from the foundation as you can see when you turn the block over:


Now you need to cut the block to size. It is best to use a square ruler of the desired size as you can position it on the block and try different angles in order to see what looks best.


When you find the perfect position cut the block to the desired measurements.
This is what my finished block looks like:


As you see options are infinite, you can play with colours, angles and shapes. Blocks can look more controlled like the blue one above when you don't change too many angles, keep lines parallel and use similar colours, or they can look more crazy when you start playing with colours, angles and shapes like I did in the red, blue and white block at the beginning of the article.
It's up to you.

In order to achieve the stained glass effect you see below just create the block in the same way that is explained above, adding stained glass piping to every seam. For the piping choose the fabric of your liking and cut 1 inch strips. Fold the strips in half lengthwise right side out and iron the fold. All you  have to do is to insert the folded strip between the fabric already sewn in place and the new piece of fabric to be added, aligning the outer edge of the strip with the outer edge of the newly added piece. That way half of the strip goes into seam allowance while the other half featuring the fold will protrude underneath the newly added piece (the seam allowance is 1/4 inch, given that the 1 inch string has been folded over, it now measures 1/2 inch; 1/4 will go into the seam allowance while the other 1/4 will create this beautiful effect).


You can simply leave the stained glass piping as it is or embellish it with all the fancy stitches your sewing machine has to offer.


 And now play and have fun, or better GO CRAZY!!!


Have you made a project following this tutorial? Let me know what you think. Did you like it? Was it easy to understand and to follow? Do you have any suggestions?
Write a comment or send me an email using the contact form at the bottom of the page.

Thanks!
-->