Binding is a difficult subject.
I simply don't have the patience to bind traditionally, attaching the back by hand. It's just too time-consuming. I have read and watched lots of tutorials on binding and tried several tecniques. Here's what works best for me (and with "works best" I mean the best compromise between good looks and praticality):
One-pass machine binding
As the name says, you only sew once directly through all layers. To be able to do this, however, you need to prepare your sandwich and binding carefully before sewing.
First measure the circumference of your quilt. You will need a strip a little bit longer than the sum of the four sides (for angles and joining the two ends). I am binding a 35x55 cm /13½x21½ in placemat, therefore I need 180 cm/ 70½ in plus about 20cm/8 in of spare length. My binding will show for about 1,2 cm/ ½ inch on the front and it will be single layer (if you want a double layer binding increase the width of the strips to almost double).
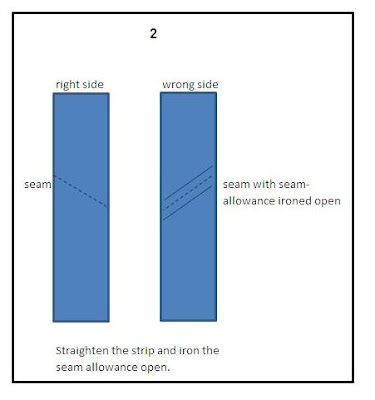
Cut strips of 5 cm/2 in and join them as shown below into one long strip. Trim away excess seam allowance, then straighten the strip and iron the remaining ¼ of an inch seam allowance open.
Iron the strip folding over both edges for a good ¼ of an inch towards the wrong side of the fabric. (For double layer binding fold the strip in half lengthwise right side out and then fold the two rough edges to one side).
Attach the binding to the quilt as shown above pinning it carefully in place, wrapping the binding around the edge of the quilt as shown below. Start from somewhere on the lower half of one of the sides and leave at least the first cm /6 in loose, they will be sewn into place after having closed the binding on itself.
Leave the binding on the back a little larger than on the front. You will be sewing from the front and won't be able to see the back and therefore you must be sure to catch the back part of the binding as well. Pin carefully and don't leave bigger spaces without pins, as when sewing you need both sides to be perfectly positioned in order to catch both edges and not risking to have any holes where the binding is not attached to the quilt on either side.
In order to be sure to catch both sides I insert the pin from the front close to the edge of the binding going through all layers, binding on the backside included and then back to the front. While on the front of the quilt the pin is very close to the edge of the binding on the back there should be a little more space between the pin and the edge of the binding.
Sew the binding in place starting from where you pinned the beginning of the strip onto the quilt using a matching thread in order to hide the stitches as much as possible (as explained above that should be in the lower half of one of the sides and the first 15 cm/6 in of the binding must not be attached yet).
Fix the seam by doing a couple of backstitches and then sew all the way around the quilt close the edge of the binding on the front of the quilt taking the single pins out as you reach them.
When you reach a corner fold the edges in order to have mitered corners as shown below.
Pin the binding in place until you reach the corner.Place the binding just until the edge of the quilt and hold it down with a pin.
With your finger fold the binding over making the mitered corner.
Stop sewing fixing the seam with a few backstitches at least 15cm/6 in before the point where you started attaching the binding. You now have most of the binding attached with beginning and end dangling freely. Now we need to join the two loose edges in the way we have been joining the single shorter strips before, only that now we have to measure exactly where to sew in order to have binding that is just as long as the side of the quit as otherwise there will be ugly creases.
Lay the binding around the last open space making the two loose ends meet in the middle. Where the two strands meet put them together right side to right side as shown below.
Trace the line where the two strands will be sewn together in order to fit the quilt perfectly.
Go back to the sewing machine and, folding the quilt so that the two strands are loose, put them right side on right side as shown above (see where we talk about joining the small strings to get one long strip). Make sure that there are no twists or turns (the easiest way is to put a pin at more points through the line where the seam will go and see if the string opens up nicely when sewn).
When everything is ok sew as explained above. Trim away excess seam allowance and iron open.
If you spread out the quilt the remaining binding that has not been attached yet should be just as long as the open space. Pin in in place in order to catch both the upper and lower edge of the binding when sewing and sew in place securing the seam with a few backstitches in the beginning and in the end.
And here's your finished quilt!
Have you made a project following this tutorial? Let me know what you think. Did you like it? Was it easy to understand and to follow? Do you have any suggestions?
Write a comment or send me an mail using the contact form at the bottom of the page.
-->


No comments:
Post a Comment