
You need to cut the following pieces:
rectangle (lower part of apron) 83x47cm
frilly bottom border 130x6cm
sashing strip 180x16cm
pocket 15x15cm
only full apron:
neckholder strip 60x6cm
top see illustration below

Start by ironing the hem of the lower part (both short sides), frill strip (both short sides and one long side) and pocket (upper edge). First iron 0.6cm seam allowance towards the wrong side of the fabric, then fold the fabric again so that the raw egde of the fabric is hidden inside the hem.

For corners iron first one side, then the other. Sew the hem in place keeping the stitching close to the edge.

On corners keep sewing until just short of the edge, with the needle down lift you presser foot and turn the fabric, keep sewing along the next side.

The next thing to do is to ruffle the lower border. To do that set your machine to a simple straight stitch and increase stitch length to 4 or 5.

make sure you have longer ends of thread at the beginning and end of the seam and sew two parallel lines close to the upper edge of the strip (the one that does not have the hem).

Now untangle the ends of the threads and use the two threads on the back (bobbin thread) to ruffle the fabric.

Keep on tugging the bobbin threads on both ends of the strip to adjust the strip to the same length as the lower edge of the apron (appr. 80cm). Then distribute the ruffles evenly on the strip.

Pin the strip to the body of the apron and attach with a straight stitch. As the raw edges of the fabrics will be in contact with your clothing during use, it is advisable to protect them against fraying by zigzagging over the raw eges on the inside of the apron.

The two seams stitched for the ruffling may well be visible now, but you can easily remove the threads as they have been stitched loosely.

Now it's time to attach the pocket. Take the square and zigzag around the three raw edges of the piece.

Then iron a seam allowance of 0.6cm towards the wrong side of the fabric on the three open sides.

Place the pocket in place on the apron and sew around the three open sides with a straight stitch. Remember to fix the stitching with a few backstitches at the beginning and the end end turn the corners just as you did when sewing the hem on the ruffled strip.

For the sashing iron the long strip in half lengthwise wrong side out. Sew it close as shown below, creating narrowing ends on both sides and leaving an opening in the middle for turning the right side of the fabric outside. The red strip represents the folded fabric strip, the black lines are the seams.

Cut away excess fabric at the ends and turn the fabric inside out throught the opening.

Prepare the upper side of the body of the apron. The finished length should 56 cm. Create folds in the fabric in order to shorten the length of the edge as shown below.

Pin the fabric to the sashing and sew together. Zigzag over the open edges on the inside of the apron.
If you wanted to make the waist apron, you're done.

If you want the full apron, keep on sewing as follows:
Prepare the neckholder by ironing the strip as follows: first iron 0.6cm of seam allowance towards the wrong side of the fabric on both long sides,

then iron the strip in half lengthwise, right side out, with the seam allowances inside the strip.

Then sew the strip closed keeping the stitches close to the edge where the seam allowances have been ironed inside.

Then sew a parallel seam along the other side of the strip to keep it flat.

Now iron the hem on the upper part of the apron so that the raw edge is hidden inside the hem as was shown before on all sides apart from the lower edge. You shouldn't have problems doing this with the curves on the two sides as they were cut on the bias.

Then place the ends of the neckholder under the hem about 1.5cm from the sides on top of the piece as shown below. Make sure the strip has no turns and twists.
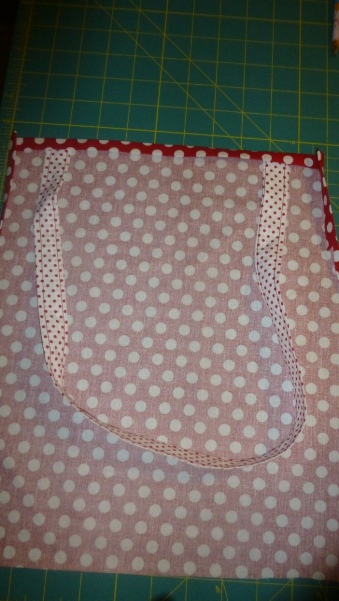
Then turn the neckholder over and pin it onto the hem as illustrated in the picture.

Fix the hem by sewing it in place as shown before, fixing at the same time the neckholder that has been inserted into the seam.

To finish the apron, pin the upper part to the upper edge of the sashing aligning it with the lower part of the apron and sew in place with a simple straight stitch, fix the stitching at the beginning and end of the seam with a few backstitches. Zigzag over the raw eges on the back of the apron.

Et voila, the apron is finished.

Have you made a project following this tutorial? Let me know what you think. Did you like it? Was it easy to understand and to follow? Do you have any suggestions?
Write a comment or send me an email using the contact form at the bottom of the page.
-->
No comments:
Post a Comment